Sunday, March 23, 2014

Bezel Mirroring

In a previous Tutorial I showed how I came about thinning my bezels for my surround down to 1 cm. Now I shall cover up the rest of the black boarders with mirrors to come close to a seemless surround. Its not perfect all the time, but for an estimated budget of $34 its not bad.


More Examples in the bottom.


Materials you will need

A small sheet of Mirror. I got mine off my local art store for $13 bucks, I went for the solid item because reflective vinyl is too thin and flimsy so I need it to be solid.

-I gave my measurements to a professional at Cascade Glass in Calgary to cut because I didn't have time ($21 after tax) , but if you are keen you can follow this guide to use a table saw: How to cut Glass with a table saw

1 ' x 12 1/4"   where 1' was a little over twice the width of the bezel and 12 1/4" is the full flesh height of the monitors after I removed the cover from the previous tutorial.


Black Electrial Tape (BET)and Scissors 

This thing is staple 

Procedure

I'm only going to show how one side is done since it fairy obvious that the other side will be done in the same way only with accordance to where the mirror will be facing.

Cut out five straps of  BETs  at 3 inchss and four at 2 inches.

Five 3 inch straps

Four 2 inch Straps

Now take one of the 3 inch straps and lay it out flat sticky side up.


Place the mirror about a  little under a cm  from the end and in the middle of the side ontop of the tape like so.

Put the short end up against the edge.


Now fold in the short sides


Finsh the Cup by wrapping up the bottom.


Complete the other end of the mirror in the same way using another one of the 3 inch tapes


Now you are ready to apply it ontop the monitor. I spread the displays apart so it won't get in the way as I secure the top lightly at first just so I have something to hold on to before I fassen the bottom, While constently adjusting to eventually get a vision I'm comfortable with. 

Top

Bottem

Now I do the same thing with 2 more tapes at the botem applied at different angles to get more grip and one more tape at the top.

More tape to wrap around the back like so.

now I cut out angles out of the 2 inchs tapes I have before


And apply them to the bottom and top as shown; carful now to toped the displays or any part of the mirror that would have content to be reflected. 


So a brief Disclaimer, This isn't a perfect solution, but it takes the least time to do and is the least expensive for something that sometimes works, you will clearly see the distortions, but its stable, and does make things a little bit better. On a flat plain it will be unoticable, but as soon as there are any angles it will be noticed but for such a short span (that 1cm of bezel you are covering) you can eventually forgive, or maybe even forget its there, to complete the immersive experiance like a full length mirror. 

Hawken (Free on Steam)


RacingRoom Racing Experience (Free on Steam)


  Guild Wars 2  (Pay once no sub ever)


Sunday, March 9, 2014

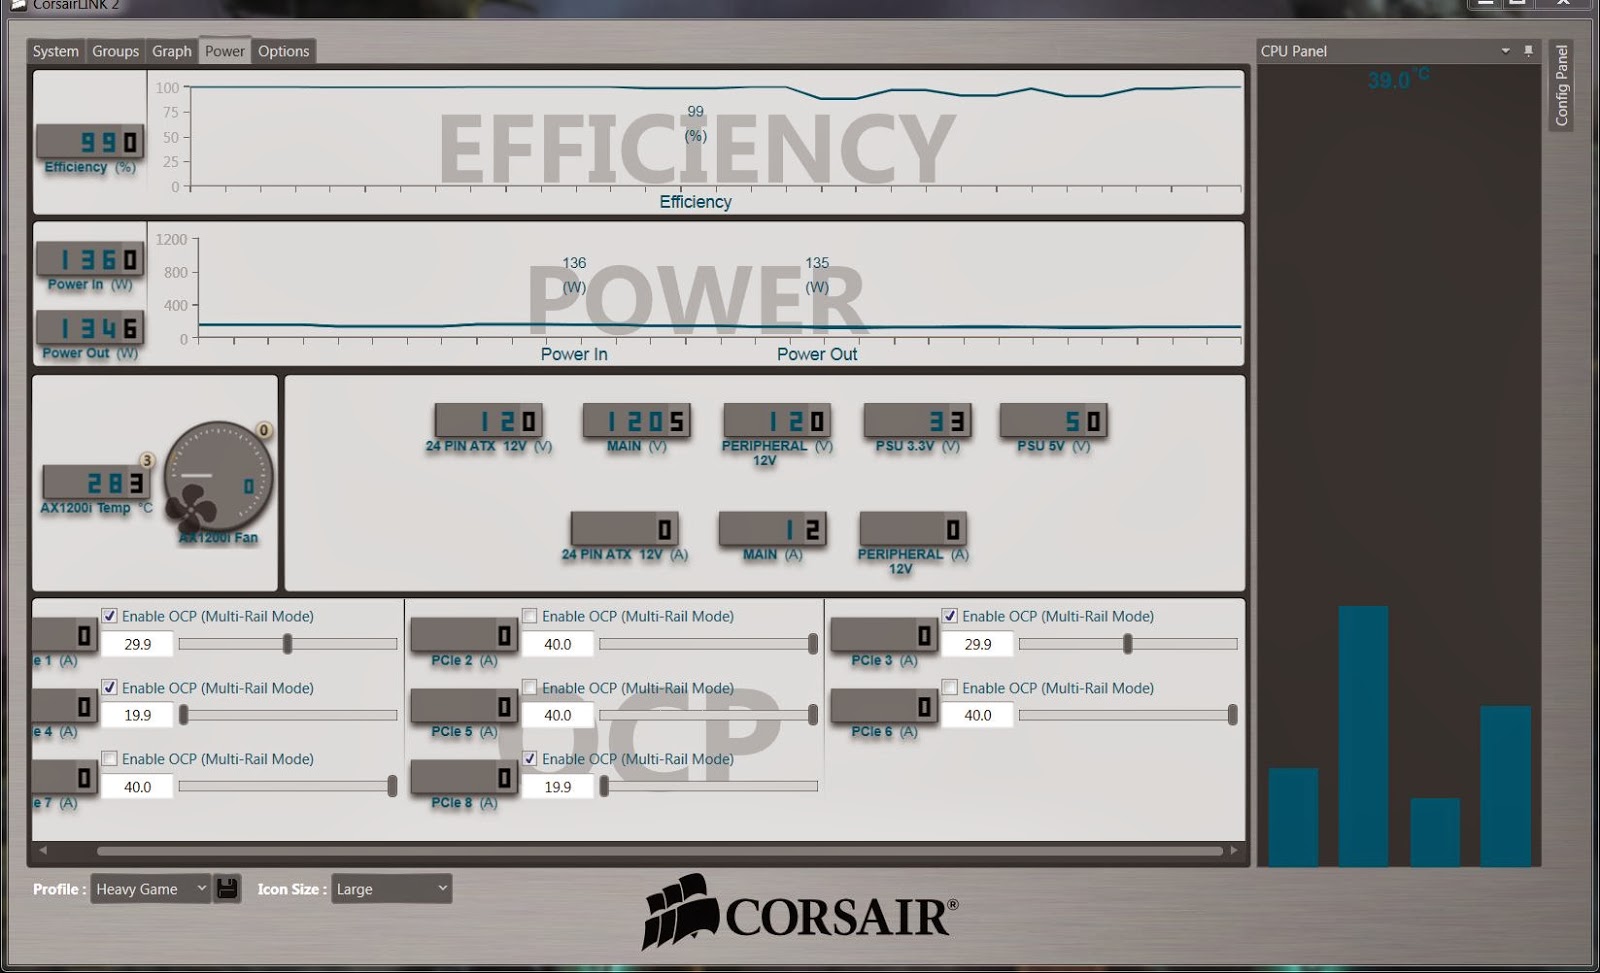
Saving Energy with a Multi-rail Power supply.

This is a bit of a hummble tutorial but its important since it saves on wasting energy. I don't claim to be a electrician, but with what common sense I do have, I know that if I can avoid drawing energy then I should, in order to save me on my eletric bill when I can.

TLDR: found out which slots you are not using and which one goes to the motherboard and click the checkmark for those boxes, and remember to save.


I am using a multi-railed power supply  which basically mean it splits the source so not all of the electricity comes from one source, but rather multiple sources depending on what you need. 

I start off by simply finding out which port are being used for what.


In my case my chasse was too tight to use PCI-E ports 3,4 and 8, so they would be the first I select to be provisioned, I found out that PCI-E 5 & 2 and 6 & 7 where being used by my graphics cards so those I have to leave at full power. PCI-E 1 is being used by my motherboard which is fine for multirailing too.


Monday, March 3, 2014

Thinning the Monitor Bezels ASUS VG23AH

I've been enjoying my less than 1cm bezels between monitors on my surround for awhile now. So much so that I've neglected to post my process. Mind you this is for modern ASUS monitors that have gamers like me as a targeted audience so these displays were expected to have their covers removed. I went on youtube and found someone else do it first with a similar model

https://www.youtube.com/watch?v=eJ0DJhjfiTY

, before my attempt, and I would recommand anyone to study the build of their monitor by manufacturer, to do the same. It goes without saying that you should have had the monitors already at the desired program setting before you start, I'll explain why later.

TLDR: remove the outter case so you have less black boarders.


First step as always is to have a workspace that is free of static, either a wooden table or rubber mats or both.


Asus is really good in how it seperates the stand component from the outer case component. So the first thing I do is lay the monitor face down on the rubber mat and then using a non-magnetic screwdriver take out the four screws holding the support stand. I arrange my screws in the same manner I took them out just incase there was variation or deformaties.  Didn't take a picture of that since it was really obvious, but we'll be re-attaching the stands to the monitor after the outter case has been removed. 


Grab a Flathead and find the space between the casing to start widening it off. You will eventually get to the plastic clips just ally light pressure and they'll come off bit by bit.


As you work your way around I found it was best to work on the ledge of the table so the monitor would have free space to divert the force, making it less likely to break. 


After you removed the backside you will see where the controls are located. Now turn the monitor over on its back, and slowly take out the controlchip from front side of the case; careful to keep it attached to it's circuitry. 


Now put the screen end of the monitor back on the table and turn the circuit board around to the back and tape it secure.


This is done to make it look nicer for the front, and because that blue light gets really annoying. so that's really 2 birds with a stone right there. I mentioned before to have your program settings all set before taking out the case, and this is why. You can still make adjustments when the computer is turned on, the buttons are just now reversed I keep one case around so I can read what each button does Its only slightly annoying if you have to do it. 


Now we simply use Black electical tape to cover-up the silver boarders.


Re-attached the stands.


You'll have to re-adjust the bezel corrections now that your monitors are closer together, I can now use 45 degrees , instead of the 76 I had previously. 


and we're good to go.  I arrange my trifold with the middle in the front and the sides behind, thereby leaving only one bezel on each side to deal with. The reason I still had to remove the outter cases for the other two monitors was to allow more room to get close behind the middle monitor.


Pardon my ruler holding its hard to hold still while taking a phone picture with another hand. But as you can see its about a centimeter maybe 1mm under as a result.


Sunday, March 2, 2014

Tablet as an Extra Monitor. And why.

Why in the world would you need another monitor if you can just use the tablet normally you ask? Well the reason is if you have something running in the backgound of the computer you are on, but can't view it in action because of the game, or movie that's taking up the foreground, its the cheapest, and more spaceist alternative to buying another display.

For example my surround screens take up everything, so when I need to see the settings of my GPU for Tuning the overclock, or the angle settings for my headtracker, I can't see it at the same time. Until now.

This also saves me the risks and hassle of relying on thrid party overlays or UIs. 

You're tablet still works as a tablet, so you can still go browse and do other things by pressing the home button as per our multitasking nature, you just now are also able to see what's going on the Computer.

The $4.99 App is called iDisplay by SHAPE GMbH which is avalible for both Android and IOS

google play
https://play.google.com/store/apps/details?id=com.idisplay.virtualscreen

Itunes
https://itunes.apple.com/ca/app/idisplay/id363500805?mt=8

The lisence you buy can't transfer over from one platform to another obviously, so choose the right one for your tablet.


The Clients either Mac or Windows for either can be downloaded for free here
http://www.getidisplay.com/

Once you've downloaded and installed it will take a bit for the set up to scan you computer then restart.


The instructions are actually pretty straight forward, it was so simple in fact that I was caught of guard so I'll show pictures to avoid confusion.

From the tablet app press the +


Now from your Computer click your new iDisplay icon then go do you tray bar to find you numbers


This uses your local private network, I'm guessing whoever invented this code just figured its easiser to do it this way than to rely on the usb, and I agree. It's kinda complicated to explain, but basically it put the computer and the graphics cards at less stress.

This fourth display is a tool which I'm starting to see the functions for, maybe later on when I begin fiming Picture in Picture or the like it could be more understood. but for now here are some shots of me using it as a set up medium for the headtracking on Guild Wars 2.

The zoom or Z-axis is a bit tricky, but it work better now that I have a live feed to compare my settings to.